
Perfect éclairs are the epitome of French pastry perfection—crispy shells, creamy fillings, and shiny glazes create an elegant and delicious dessert. While they may seem challenging, mastering the basics ensures stunning results every time. For tips on perfecting éclairs, check out Eclair Icing and Baking Secrets: Everything You Need to Know About Eclairs. This guide covers essential icing techniques and troubleshooting tips.
With practice, you’ll create éclairs worthy of a Parisian pâtisserie!

Table of Contents
Mastering the Choux Pastry
What is Choux Pastry?
Choux pastry, or pâte à choux, is the foundation of éclairs. Unlike other pastries, it puffs up during baking without the use of a rising agent like yeast or baking powder. The magic happens because of steam created by the high moisture content of the dough.
The goal is to achieve a dough that’s smooth, shiny, and holds its shape when piped. When baked correctly, the choux pastry creates a crisp shell with a hollow interior, perfect for fillings.
Step-by-Step Tips for Perfect Choux Pastry
- Measure Precisely: Choux pastry is a precision game. Use a digital kitchen scale to measure ingredients like flour, butter, and water. Even slight variations can affect the texture.
- Cook the Dough Thoroughly: When combining butter, water, and flour on the stovetop, cook until the mixture forms a ball and leaves a thin film on the bottom of the pan. This ensures enough moisture evaporates, so the dough isn’t too wet.
- Incorporate Eggs Gradually: Add eggs one at a time, fully incorporating each before adding the next. The dough should be smooth and glossy, forming a “V” shape when lifted with a spatula.
Tools You’ll Need for Success
- Piping Bags: Opt for sturdy, reusable piping bags to handle the thick choux dough.
- Nozzles: Use a large star nozzle for éclairs with ridged surfaces, which helps them bake evenly.
- Baking Tray: A non-stick silicone mat or parchment paper will keep the éclairs from sticking.
Getting the choux pastry right is the foundation for successful éclairs.

Perfect Piping Techniques
Why Piping Technique Matters
Piping is where éclairs take shape, both literally and visually. Uniformly piped éclairs ensure even baking and a professional look. The dough’s consistency is crucial—too thin, and they’ll lose their shape; too thick, and they’ll turn out tough and dense.
For the finishing touch, learn How Do You Make Éclair Icing? A Complete Step-by-Step Guide to create a glossy glaze that elevates your éclairs to bakery-quality perfection.
How to Pipe Éclairs Like a Pro
- Prepare Your Piping Bag: Fit your piping bag with a large star nozzle or round tip and fill it with the choux dough. Don’t overfill; leave enough space to control the pressure.
- Hold the Bag at an Angle: Keep the piping bag at a 45-degree angle to the baking tray for better control.
- Pipe Consistently: Squeeze the bag with steady, even pressure to pipe éclairs that are about 4–5 inches long. Release the pressure and lift the nozzle cleanly for a smooth finish.
Smoothing and Spacing
- Smooth the Ends: Use a damp finger or the back of a spoon to gently smooth the ends of each éclair to avoid uneven tips or cracks during baking.
- Proper Spacing: Leave at least 1 inch of space between each éclair to allow for even expansion.
Quick Troubleshooting
- If the dough spreads too much, it may be too wet—add a touch more flour to adjust.
- Uneven piping? Practice on parchment paper before piping onto your baking tray.
Mastering piping ensures éclairs bake evenly and look bakery-perfect.
Baking the Éclairs
The Importance of Temperature Control
Éclairs rise due to the steam created during baking. Achieving the perfect puff requires careful control of oven temperature. A high initial heat helps them expand quickly, while a lower temperature ensures they dry out evenly.
Step-by-Step Guide to Baking Éclairs
- Preheat the Oven: Set your oven to 375°F (190°C). Always preheat fully before placing your éclairs inside—this ensures an immediate burst of steam.
- Start with High Heat: Bake the éclairs at 375°F for the first 15 minutes. This encourages them to puff up.
- Lower the Temperature: Reduce the heat to 325°F (160°C) for the remaining time (10–15 minutes) to prevent burning and dry out the interior.
Avoiding Common Baking Issues
- Don’t Open the Oven Door: Opening the door releases steam, causing éclairs to deflate. Resist the temptation to peek!
- Bake Until Golden: Éclairs should be golden brown and feel firm to the touch. If they’re pale or soft, they’ll collapse once cooled.
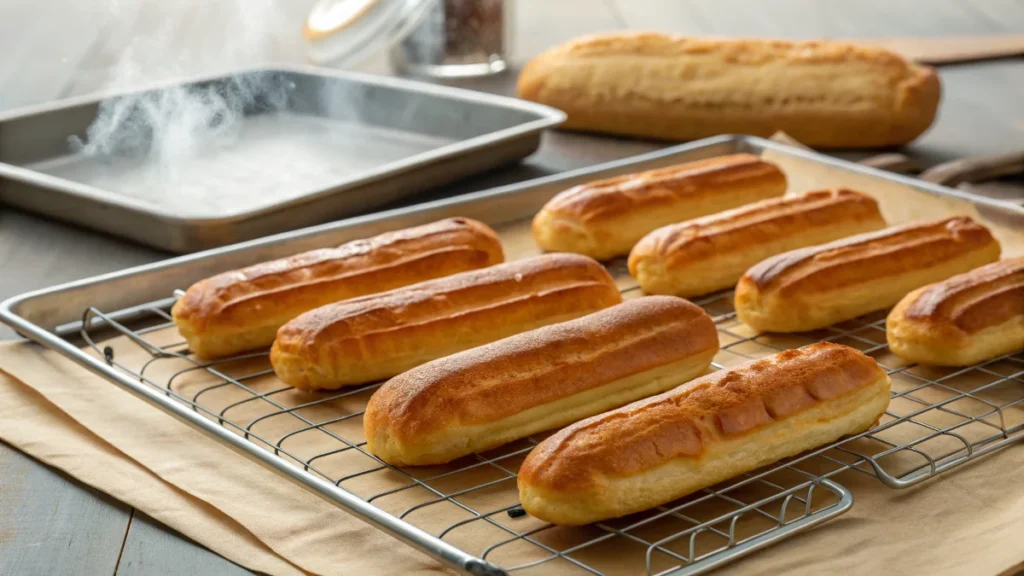
Post-Baking Drying
After baking, use a skewer or toothpick to poke small holes in the bottom of each éclair. Return them to the oven for another 5–10 minutes with the door slightly ajar. This step helps release any trapped steam, preventing soggy shells.
Quick Tip
If you’re unsure whether your éclairs are fully baked, leave them in the oven for an extra minute or two. Over-drying is better than undercooking!
Perfectly baked éclairs should be crisp on the outside and hollow on the inside, ready to be filled with delicious cream.
Preparing the Filling
The Heart of an Éclair
The filling is what transforms éclairs from simple pastry shells into decadent treats. The most common filling is pastry cream (crème pâtissière), but there are endless variations to explore.
Making Traditional Pastry Cream
- Ingredients: Egg yolks, sugar, milk, cornstarch, and vanilla extract.
- Whisking the Base: Combine egg yolks and sugar until pale, then add cornstarch for thickening.
- Cooking the Cream: Slowly whisk the egg mixture into warm milk and cook over medium heat until thickened. Remove from heat and stir in vanilla.
- Chill Completely: Transfer to a bowl, cover with plastic wrap (touching the surface to prevent a skin from forming), and refrigerate until fully chilled.
Creative Filling Variations
- Chocolate Pastry Cream: Add melted dark chocolate to your pastry cream for a rich flavor.
- Coffee Filling: Stir in espresso powder for a bold, aromatic twist.
- Fruit Fillings: Lighten the texture by folding whipped cream into fruit purées like raspberry or mango.
Piping the Filling
Once your shells are cool, use a piping bag fitted with a small round nozzle to fill the éclairs. Insert the nozzle into a hole at the bottom or side of each shell, squeezing gently until the shell is filled but not overstuffed.
Pro Tips
- Chill the pastry cream before filling to avoid melting the shells.
- Pipe a little filling into each end of the éclair to ensure an even distribution.
With a smooth, flavorful filling, your éclairs will become irresistible desserts.
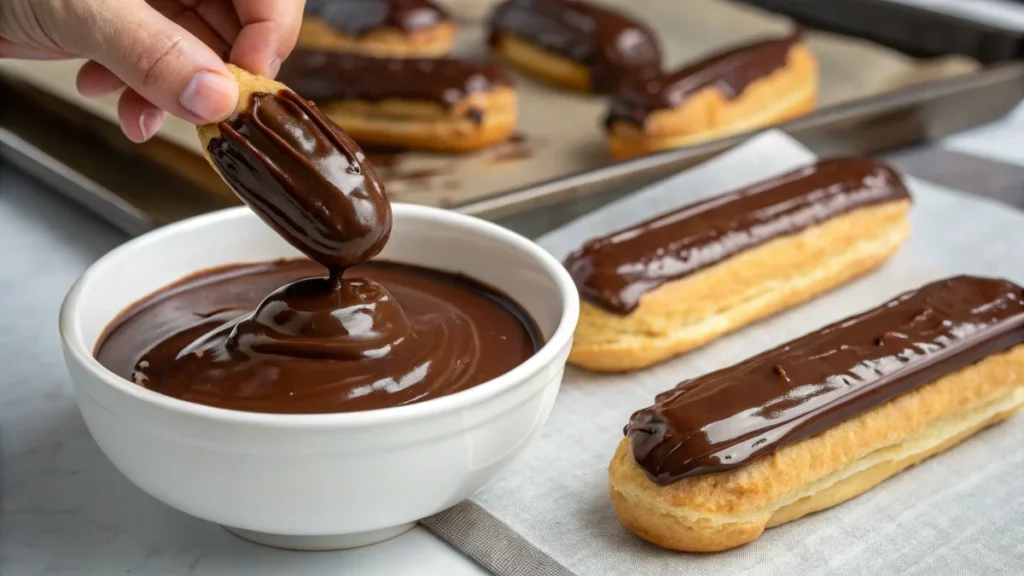
Achieving the Perfect Glaze
Why the Glaze Matters
A shiny, smooth glaze is the finishing touch that gives éclairs their professional look. Beyond aesthetics, it also enhances the flavor, adding a layer of sweetness or richness.
Types of Glazes for Éclairs
- Chocolate Ganache: A classic glaze made by melting chocolate with heavy cream for a rich, glossy finish.
- Icing Glaze: A simple mixture of powdered sugar, water, and a touch of vanilla. Add cocoa powder for a chocolate variation.
- Caramel Glaze: For a decadent twist, use caramelized sugar for your éclairs.
How to Apply the Glaze
- Dip the Éclair Tops: Hold each éclair by its sides and gently dip the top into the glaze, ensuring an even coating. Let excess glaze drip off.
- Use a Spatula for a Smooth Finish: If needed, use a small offset spatula to spread the glaze evenly.
- Add Decorations: While the glaze is still wet, sprinkle with nuts, edible glitter, or drizzle with contrasting chocolate for an elegant finish.
Quick Tip
To avoid a thick or clumpy glaze, keep it slightly warm when applying. Thin with a few drops of warm water or cream if needed.
Presentation and Storage
The Importance of Presentation
How éclairs are presented can elevate them from a simple dessert to a show-stopping centerpiece. Clean, polished presentation enhances their appeal and reflects the effort behind creating them. If you’re curious about the origin of éclairs, explore Why Is the Cake Called Éclair? The Fascinating History Behind Its Name to uncover the story behind their name and significance
Tips for Presenting Éclairs
- Uniform Sizes: Consistency is key. Ensure your éclairs are the same size by piping them evenly. You can even draw guidelines on parchment paper for precision.
- Use a Platter or Stand: Arrange éclairs neatly on a dessert stand or tray. A tiered stand works wonderfully for elegant events.
- Add Garnishes: Sprinkle finely chopped nuts, edible flowers, or drizzle chocolate over the glaze for a professional look. Dust powdered sugar for a classic touch or add edible gold leaf for an upscale finish.
Storing Your Éclairs Properly
- Unfilled Shells: Store baked, unfilled shells in an airtight container at room temperature for up to 2 days. Alternatively, freeze them for up to 1 month. When ready to use, thaw at room temperature.
- Filled Éclairs: Once filled, éclairs should be stored in the refrigerator. They are best eaten within 24–48 hours to maintain their crispness and freshness.
- Avoid Storing Glazed Éclairs for Too Long: The glaze can lose its shine and texture over time, so glaze them shortly before serving.
A well-presented éclair not only tastes delicious but also leaves a lasting impression on your guests.
Troubleshooting Common Issues
Even experienced bakers can encounter challenges when making éclairs. Here’s a guide to identifying and fixing common problems:
1. Flat or Collapsed Éclairs
- Cause: The dough was undercooked, or the oven door was opened too soon.
- Solution: Bake éclairs until they are golden and crisp, and avoid opening the oven door during baking. Use an oven thermometer to ensure accurate temperatures.
2. Cracked Éclairs
- Cause: The dough consistency wasn’t smooth, or the oven temperature was too high.
- Solution: Ensure the dough is mixed properly and smooth out the tops with a wet finger before baking. Reduce the oven temperature slightly if cracking persists.
3. Hollow but Soggy Centers
- Cause: Insufficient drying after baking.
- Solution: After baking, poke holes in the éclairs to release steam and return them to the oven for 5–10 minutes to dry out completely.
4. Unevenly Baked Éclairs
- Cause: Poor oven circulation or overcrowded baking trays.
- Solution: Bake one tray at a time and rotate the tray halfway through baking for even browning.
5. Filling Leaks Out of the Shell
- Cause: Overfilling or improper filling technique.
- Solution: Use a small nozzle to pipe filling into pre-punched holes at the bottom of the éclair. Avoid overfilling to maintain the structure of the shell.
6. Glaze Looks Dull or Cracked
- Cause: The glaze wasn’t applied at the right consistency or temperature.
- Solution: Keep the glaze slightly warm and stir occasionally to maintain its shine. Avoid applying thick or overcooled glaze.
By identifying these issues and applying the right fixes, you’ll ensure your éclairs turn out perfectly every time.
Creative Éclair Variations
Elevate Your Éclairs with Unique Flavors
While classic éclairs are a timeless treat, experimenting with new flavors and designs can make your éclairs stand out. Whether you’re hosting a party or simply want to surprise your family, here are some creative ideas:
Flavor Innovations
- Matcha Éclairs: Infuse the pastry cream with matcha powder for an earthy, slightly bitter twist. Pair it with a white chocolate glaze.
- Salted Caramel Éclairs: Fill éclairs with salted caramel pastry cream and top them with a caramel glaze sprinkled with sea salt.
- Tropical Éclairs: Use passion fruit or mango purée in the filling and glaze for a bright, fruity flavor.
- Choco-Berry Fusion: Fill éclairs with chocolate cream and top with a raspberry glaze for a sweet-tart contrast.
Savory Éclairs
Éclairs don’t always have to be sweet! Create savory éclairs by:
- Filling them with herbed cream cheese, smoked salmon mousse, or goat cheese and chives.
- Skipping the glaze and topping with sesame seeds or shredded Parmesan.
Visual Creativity
- Colorful Glazes: Use natural food coloring to create pastel glazes for weddings or baby showers.
- Layered Décor: Add layers of chocolate drizzles or edible gold leaf for an upscale look.
- Themed Éclairs: Decorate éclairs with patterns or colors to suit a holiday or special occasion.
Adding your personal flair to éclairs allows you to tailor them to your taste and event.

FAQs About Making Perfect Éclairs
What is the best tip for éclairs?
The key to perfect éclairs lies in mastering your choux pastry. Cook the dough thoroughly on the stovetop to eliminate excess moisture before gradually adding eggs. This ensures a smooth, glossy texture. Use a star nozzle to pipe evenly shaped éclairs and bake at high heat to create steam, then lower the temperature to dry them out completely. For additional tips on achieving flawless baked goods, check out What is the Secret to a Good Biscuit? Essential Tips for Perfect Biscuits.
How to stop éclairs from going soggy?
To prevent éclairs from becoming soggy, pierce small holes in the bottom of each shell immediately after baking to release trapped steam. Return the shells to the oven at a lower temperature (325°F/160°C) for 5–10 minutes to dry out completely. Once filled, refrigerate éclairs in an airtight container and consume them within 24–48 hours to maintain freshness.
How to keep éclairs crispy?
To keep éclairs crispy, ensure they are baked until golden brown and fully dried out. Store unfilled shells in an airtight container at room temperature for up to 2 days or freeze them for longer storage. Avoid filling the shells too far in advance, as the moisture from the filling can soften the shells.
What is the best nozzle tip for éclairs?
The best nozzle tip for éclairs is a large star nozzle. The ridges created by the star tip allow the dough to expand evenly during baking, reducing the risk of cracks. A round nozzle can also be used but may require extra care to smooth the dough’s surface before baking.
Conclusion
Making perfect éclairs might seem challenging, but with the right techniques, you can create bakery-worthy pastries at home. From mastering choux pastry to piping, baking, and adding a beautiful glaze, each step is an opportunity to refine your skills.
Whether you stick with classic fillings or experiment with creative flavors, éclairs are versatile and always impressive. For a unique take, explore How to Make Eclairs Without Eggs: A Complete Step-by-Step Guide to craft delightful egg-free éclairs.
With this guide and a little practice, you’ll soon be making éclairs that are crisp, creamy, and absolutely delicious. Now, it’s time to get baking—your perfect éclairs are just a few steps away!