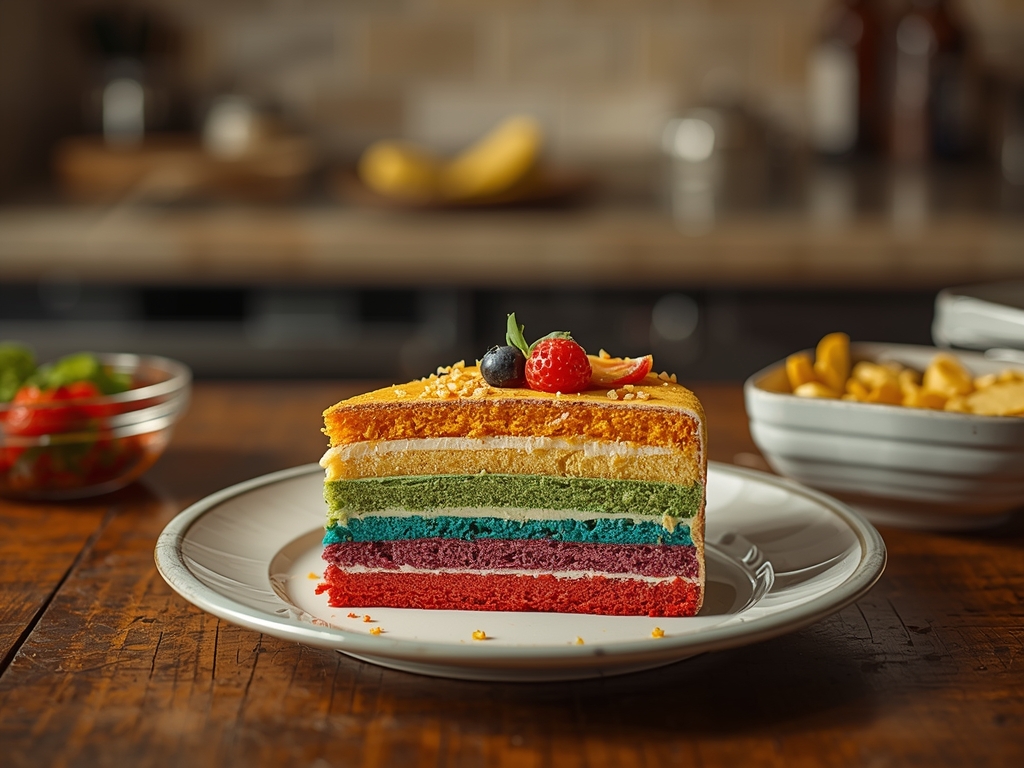
Colorful ombre layer cake, a symphony of colors and flavors, is more than just a dessert; it’s a centerpiece, a celebration, a memory in the making. I remember baking my first ombre cake: the kitchen was a complete disaster, but the look on my daughter’s face when she saw that gradient of pinks made every floury moment worth it. This colorful ombre layer cake will undoubtedly become a showstopper at your next gathering.
Table of Contents
Why You Will Love This colorful ombre layer cake Recipe
This colorful ombre layer cake recipe is a guaranteed crowd pleaser. It’s surprisingly easy to make, even with the multiple layers and frosting. The soft, buttery cake pairs perfectly with the sweet vanilla buttercream. Imagine the delighted gasps as you present this beautiful cake. The ombre effect is visually stunning. Plus, it’s incredibly customizable; you can choose any color palette you like! If you love cake you’ll surely want to check out my recipe for Moist Carrot Layer Cake.
It’s a delicious stress free recipe!
Ingredients Needed for This colorful ombre layer cake Recipe
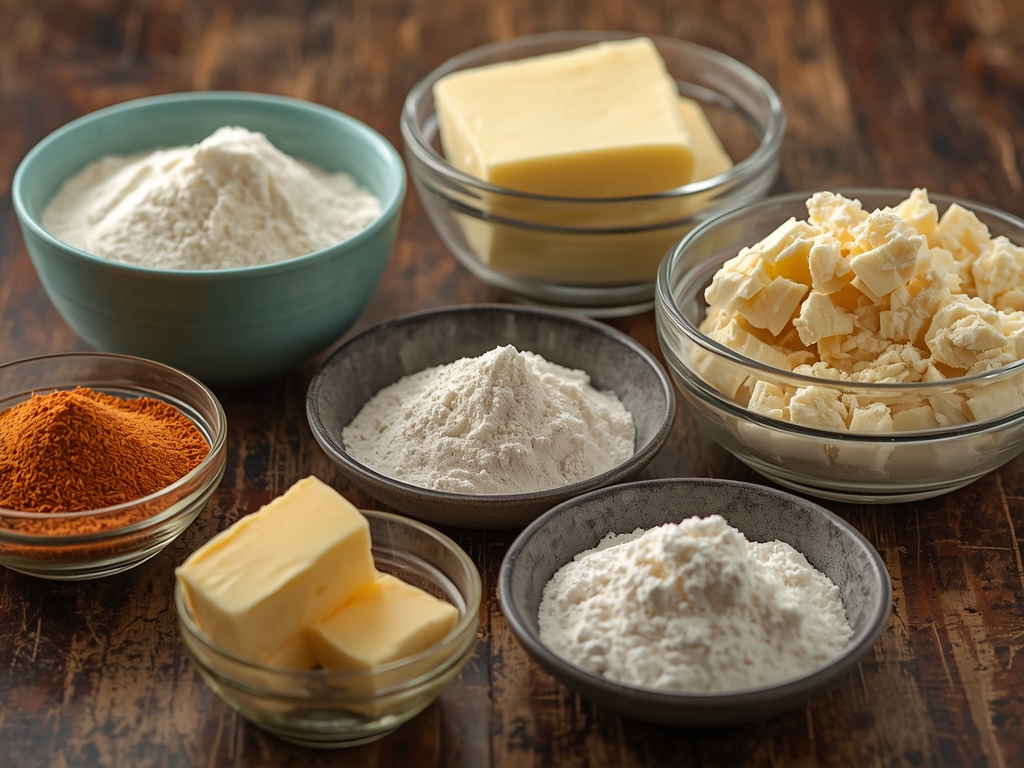
For the Cake Layers:- 3 cups all purpose flour
- 1 tablespoon baking powder
- 1/2 teaspoon salt
- 1 cup (2 sticks) unsalted butter, softened
- 2 cups granulated sugar
- 4 large eggs
- 1 tablespoon vanilla extract
- 1 1/4 cups milk
- Gel food coloring (various shades of your desired color)
- 1 1/2 cups (3 sticks) unsalted butter, softened
- 6 cups confectioners’ sugar
- 1/2 cup milk
- 2 tablespoons vanilla extract
How to Make This colorful ombre layer cake Recipe
- 1. Preheat and Prep: Preheat your oven to 350°F (175°C). Grease and flour three 9 inch round cake pans.
- 2. Dry Ingredients: In a large bowl, whisk together the flour, baking powder, and salt.
- 3. Cream Butter and Sugar: In a separate bowl, cream together the softened butter and sugar until light and fluffy.
- 4. Add Eggs and Vanilla: Beat in the eggs one at a time, then stir in the vanilla extract.
- 5. Alternate Wet and Dry: Gradually add the dry ingredients to the wet ingredients, alternating with the milk, beginning and ending with the dry ingredients. Mix until just combined. Avoid overmixing.
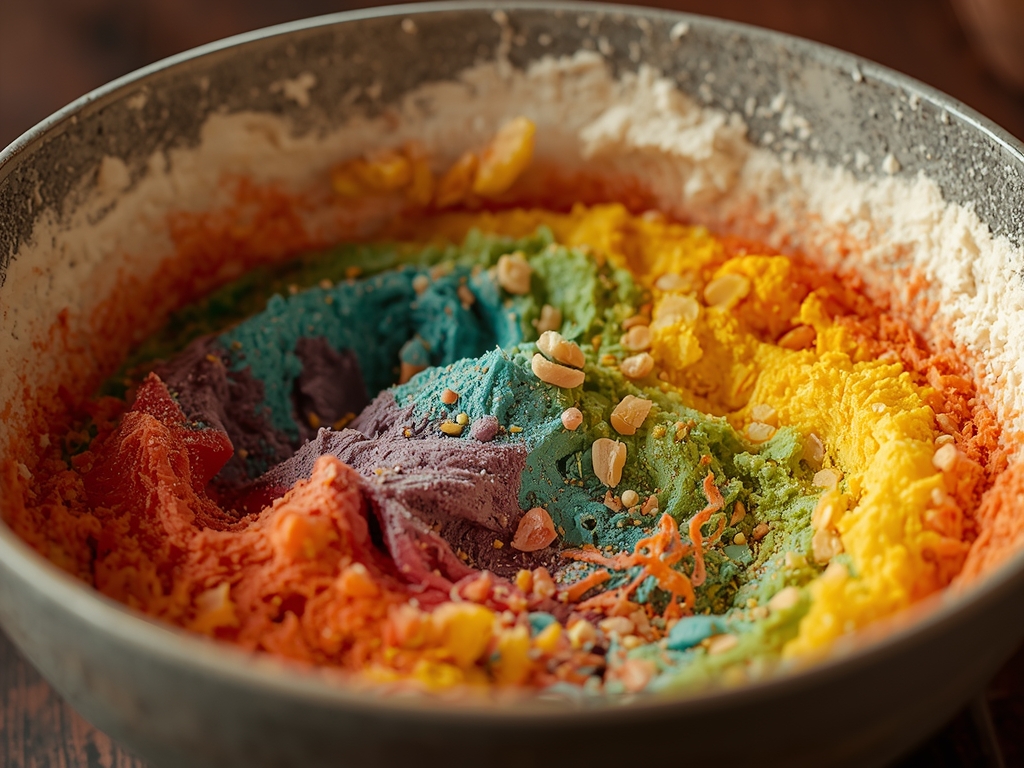
- 6. Divide and Color the Batter: Divide the batter evenly into three bowls. Tint each bowl with a different shade of your chosen gel food coloring to create an ombre effect. Start with a small amount of coloring and gradually add more until you achieve your desired shades. I find it helpful to take a photo of my color palette at this stage, so I have it for the frosting.
- 7. Bake the Cakes: Pour each colored batter into a prepared cake pan. Bake for 25 30 minutes, or until a wooden skewer inserted into the center comes out clean.
- 8. Cool the Cakes: Let the cakes cool in the pans for 10 minutes before inverting them onto a wire rack to cool completely.
- 9. Make the Buttercream: While the cakes are cooling, prepare the vanilla buttercream frosting. In a large bowl, cream together the softened butter and confectioners’ sugar until light and fluffy.
- 10. Add Milk and Vanilla: Gradually add the milk and vanilla extract, beating until smooth and creamy.
- 11. Assemble the Cake: Once the cakes are completely cool, level them with a serrated knife if necessary. Place the darkest colored cake layer on a serving plate or cake stand. Frost the top of the cake with a generous layer of buttercream.
- 12. Continue Layering: Place the medium colored cake layer on top of the frosting. Frost with another layer of buttercream. Top with the lightest colored cake layer and frost the entire cake with buttercream.
- 13. Create the Ombre Effect: Use a spatula or cake scraper to smooth the frosting around the sides of the cake. You can create a subtle ombre effect on the frosting by starting with a darker shade of buttercream at the bottom and gradually lightening it as you move towards the top. I like to pull the frosting upward to create little peaks and texture.
- 14. Chill and Serve: Refrigerate the cake for at least 30 minutes before serving to allow the frosting to set. For more cake inspiration check out this Chocolate Cherry Layer Cake 2
How to Serve This colorful ombre layer cake Recipe
Serve this beautiful colorful ombre layer cake as a stunning centerpiece for birthdays, celebrations, or any special occasion. Accompany with fresh berries for a pop of color and flavor.
Consider offering slices with a scoop of vanilla ice cream or a dollop of whipped cream. A simple dusting of powdered sugar adds an elegant touch. Brew a pot of coffee or tea to complement the sweetness of the cake. Its also really yummy served chilled and slightly frozen.
How to Store This colorful ombre layer cake Recipe
Store leftover colorful ombre layer cake in an airtight container in the refrigerator for up to 3 days.
For longer storage, freeze the cake slices individually. Wrap each slice tightly in plastic wrap and then place them in a freezer safe bag or container. Frozen cake slices can be stored for up to 2 months. Thaw frozen cake slices in the refrigerator before serving.
Tips to Make This colorful ombre layer cake Recipe
- Room Temperature Ingredients: Use room temperature butter and eggs for a smoother batter.
- Don’t Overmix: Avoid overmixing the batter, as this can result in a tough cake.
- Even Layers: Use a kitchen scale for even batter distribution.
- Gel Food Coloring: Gel food coloring provides more vibrant color than liquid food coloring.
- Chill Before Frosting: Make sure cakes are fully cooled off before frosting! No one likes gooey melted frosting sliding off from a hot piece of cake!
- Flavor the Buttercream: Add flavor extracts such as almond, lemon, or orange to compliment and add to your cake.
Helpful Notes for This colorful ombre layer cake Recipe
For best results, use high quality vanilla extract. Pastry flour can be substituted for all purpose flour for a more tender cake. If you don’t have gel food coloring, you can use liquid food coloring, but you may need to use more to achieve the desired color intensity.
Before frosting, try brushing your cake with a simple syrup to add extra moisture. Store bought cake mix can be substituted with this recipe if you are on a time crunch and want a fast easy way to make a cake!
Variation of This colorful ombre layer cake Recipe
For a seasonal twist, incorporate fruit fillings like raspberry jam or lemon curd between the layers. Consider adding chocolate chips, chopped nuts, or sprinkles to the batter for added texture and flavor. Another idea you could infuse the cake layers with different flavors. Try lemon flavoring, you could infuse the cake layers with different extracts, such as almond or coconut. Play around with the frosting and use flavors that compliment your cake color and design. Another really delicious cake is my Layered Vanilla Chocolate Strawberry Cake !
What kind of frosting is best for an ombre cake?
How do you get the ombre effect on a cake?
Can I use different colors for my ombre cake?
What size cake pans are best for a layer cake?
Conclusion
Bring delight to your next celebration with this gorgeous and delicious colorful ombre layer cake. The soft, moist cake layers, combined with the sweet vanilla buttercream and stunning ombre effect, are sure to impress. Don’t be intimidated, grab your ingredients and have some fun baking! If you try out this fantastic recipe, spread the joy by sharing with your friends! And be sure to Follow us on Pinterest for more amazing recipe inspiration.
Print
Colorful Ombre Layer Cake: Easy Step-by-Step Design
- Total Time: 2 hours
- Yield: 12 servings 1x
Description
A visually stunning and delicious colorful ombre layer cake, perfect for special occasions. Soft cake layers and sweet vanilla buttercream in a beautiful gradient.
Ingredients
- For the Cake Layers:
- 3 cups all purpose flour
- 1 tablespoon baking powder
- 1/2 teaspoon salt
- 1 cup (2 sticks) unsalted butter, softened
- 2 cups granulated sugar
- 4 large eggs
- 1 tablespoon vanilla extract
- 1 1/4 cups milk
- Gel food coloring (various shades of your desired color)
- For the Vanilla Buttercream Frosting:
- 1 1/2 cups (3 sticks) unsalted butter, softened
- 6 cups confectioners’ sugar
- 1/2 cup milk
- 2 tablespoons vanilla extract
Instructions
- Preheat oven to 350°F (175°C). Grease and flour three 9 inch round cake pans.
- In a large bowl, whisk together the flour, baking powder, and salt.
- In a separate bowl, cream together the softened butter and sugar until light and fluffy.
- Beat in the eggs one at a time, then stir in the vanilla extract.
- Gradually add the dry ingredients to the wet ingredients, alternating with the milk, beginning and ending with the dry ingredients. Mix until just combined. Avoid overmixing.
- Divide the batter evenly into three bowls. Tint each bowl with a different shade of your chosen gel food coloring to create an ombre effect. Start with a small amount of coloring and gradually add more until you achieve your desired shades.
- Pour each colored batter into a prepared cake pan. Bake for 25 30 minutes, or until a wooden skewer inserted into the center comes out clean.
- Let the cakes cool in the pans for 10 minutes before inverting them onto a wire rack to cool completely.
- While the cakes are cooling, prepare the vanilla buttercream frosting. In a large bowl, cream together the softened butter and confectioners’ sugar until light and fluffy.
- Gradually add the milk and vanilla extract, beating until smooth and creamy.
- Once the cakes are completely cool, level them with a serrated knife if necessary. Place the darkest colored cake layer on a serving plate or cake stand. Frost the top of the cake with a generous layer of buttercream.
- Place the medium colored cake layer on top of the frosting. Frost with another layer of buttercream. Top with the lightest colored cake layer and frost the entire cake with buttercream.
- Use a spatula or cake scraper to smooth the frosting around the sides of the cake. You can create a subtle ombre effect on the frosting by starting with a darker shade of buttercream at the bottom and gradually lightening it as you move towards the top.
- Refrigerate the cake for at least 30 minutes before serving to allow the frosting to set.
- Prep Time: 25 minutes
- Cook Time: 30 minutes
- Category: Dessert
- Cuisine: American
Nutrition
- Calories: 450
- Sugar: 45g
- Sodium: 200mg
- Fat: 25g
- Saturated Fat: 15g
- Carbohydrates: 55g
- Fiber: 1g
- Protein: 4g
- Cholesterol: 100mg
Keywords: ombre cake, layer cake, colorful cake, buttercream, vanilla