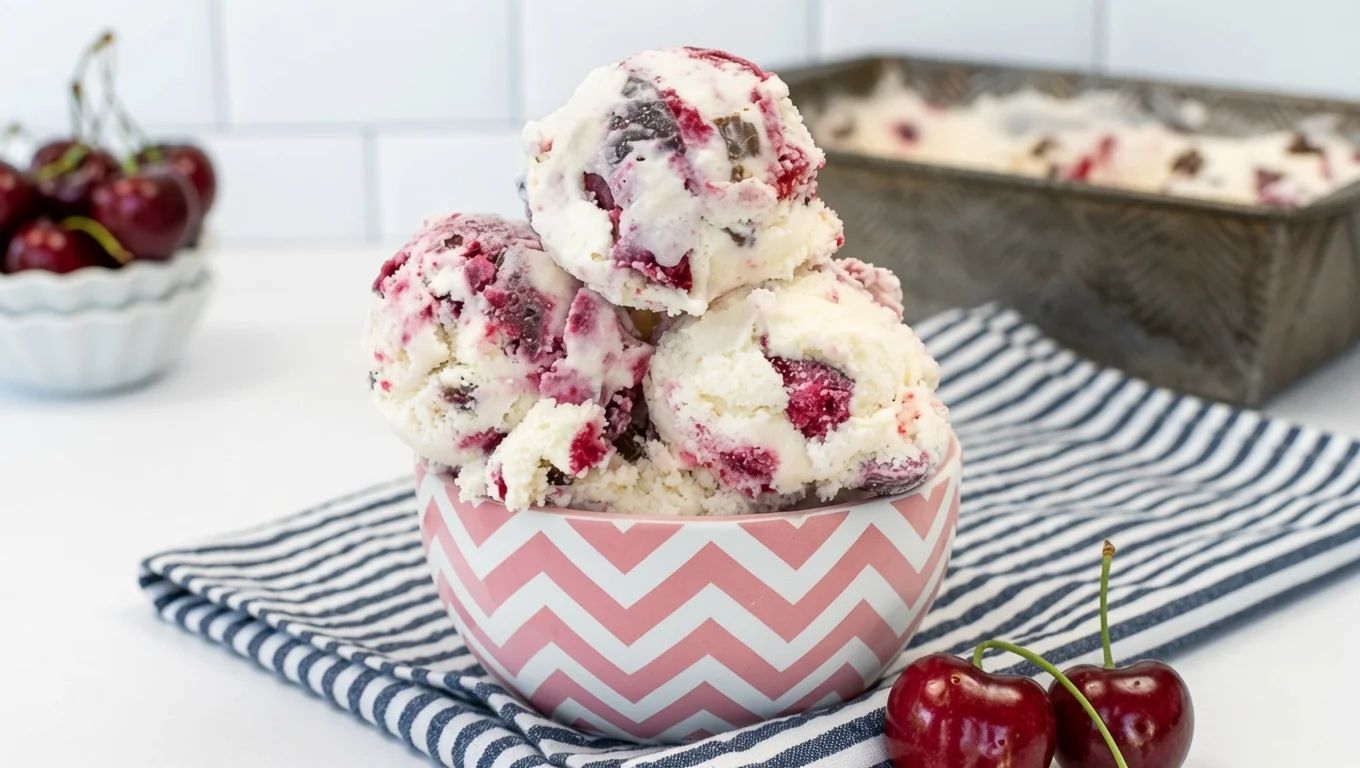
Cherry Vanilla Ice Cream is one of those genuinely perfect summer recipes that combines two of the world’s most beloved flavors into a single spectacularly delicious frozen dessert that is impossible to stop eating. Silky, rich, pure vanilla ice cream swirled with layers of thick sweet-tart fresh cherry filling and studded throughout with chunks of dark chocolate creates a combination that is refreshing, indulgent, and completely satisfying all at once. This Cherry Vanilla Ice Cream has become a standout summer favorite here at Recipes Charming, and Charlie your culinary guide is so excited to share every simple step of making this incredible homemade frozen dessert that will make your entire family absolutely delighted.
What makes this particular recipe so wonderfully approachable is that it requires no egg yolks, no custard cooking, no tempering, and no complex preparation. The entire vanilla ice cream base is made by simply whisking together a handful of ingredients in a large bowl and pouring it into your ice cream maker. The cherry filling is equally simple, a brief simmer of fresh pitted cherries with sugar, water, and a small amount of cornstarch that produces a thick, glossy, deeply flavorful cherry sauce that swirls beautifully through the finished ice cream.
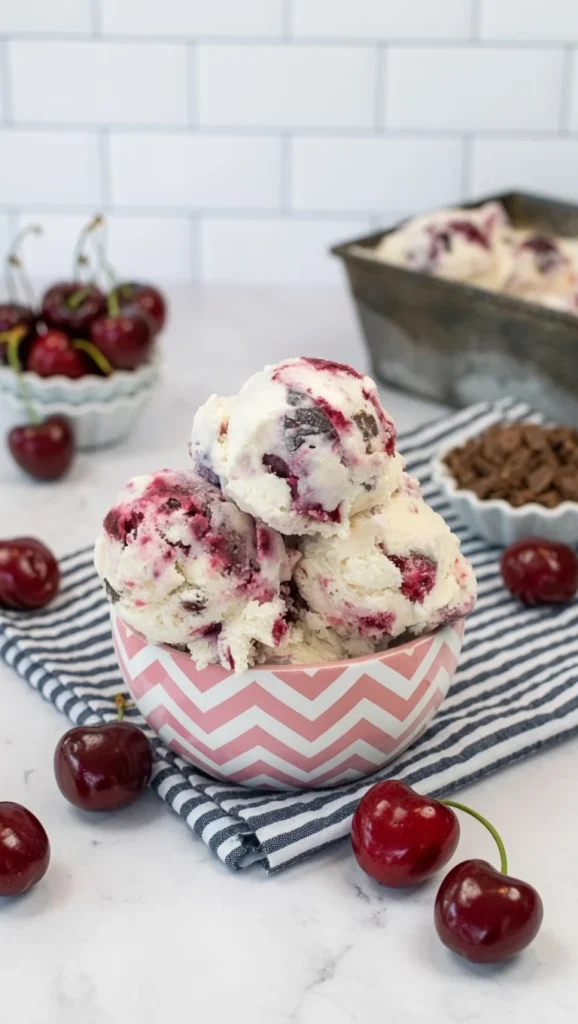
Table of Contents
Why You Will Love This Cherry Vanilla Ice Cream Recipe
This recipe is genuinely extraordinary and will become your most requested summer dessert. First, using fresh cherries to make a quick homemade cherry filling rather than using a commercial cherry topping produces a flavor that is dramatically fresher, more vibrant, and more genuinely cherry-tasting than anything that comes from a can or a jar. The brief simmer concentrates the cherry flavor while the small amount of cornstarch creates just enough body to produce that beautiful thick swirl rather than a thin watery liquid that sinks to the bottom.
Second, the vanilla ice cream base in this recipe is remarkably smooth and creamy because of the correct fat ratio between heavy whipping cream and whole milk. This balance produces a soft, scoopable texture with minimal ice crystal formation that remains beautifully creamy even after several days in the freezer.
Third, the addition of dark chocolate chunks folded in at the end of churning elevates this ice cream into something truly spectacular, creating a dessert that is unmistakably inspired by the legendary Cherry Garcia flavor but made entirely from scratch with real fruit. For more incredible summer dessert and sweet recipe ideas explore the Recipes Charming homepage where Charlie has gathered a wonderful collection of beautiful and crowd-pleasing recipes for every sweet occasion.
Ingredients Needed for This Cherry Vanilla Ice Cream Recipe
For the cherry filling:
- 2 cups fresh cherries pitted and halved
- 2 tablespoons granulated sugar
- 2 tablespoons water
- 1 tablespoon cornstarch
For the vanilla ice cream base:
- 2 cups heavy whipping cream
- 1 cup whole milk
- ¾ cup granulated sugar
- 4 teaspoons pure vanilla extract
- Pinch of coarse sea salt
- ½ cup dark chocolate chunks
How to Make This Cherry Vanilla Ice Cream Recipe
Step 1: Begin with the cherry filling so it has ample time to cool completely before use. Combine the pitted halved cherries, granulated sugar, water, and cornstarch in a medium saucepan. Stir until the cornstarch is dissolved into the liquid with no lumps remaining. Heat over medium heat, stirring regularly, for 8 to 10 minutes until the filling thickens, the cherries soften and release their vibrant juice, and the mixture becomes glossy and syrupy. Remove from heat and allow to cool at room temperature for at least 1 hour then refrigerate until completely chilled. The cherry filling must be cold before layering into the ice cream.
Step 2: Ensure your ice cream maker bowl is completely frozen according to manufacturer instructions. Most machines with freezer bowls require a minimum of 24 hours of freezing before use.
Step 3: In a large bowl or a large measuring cup with a spout for easy pouring, whisk together the heavy whipping cream, whole milk, granulated sugar, vanilla extract, and pinch of sea salt. Whisk vigorously until the sugar has fully dissolved into the liquid, approximately 2 to 3 minutes of steady whisking. Taste and add a touch more vanilla if desired.
Step 4: With your ice cream maker running and the dasher rotating, slowly pour the prepared vanilla base into the chilled canister. Churn according to your manufacturer’s specific instructions, approximately 20 to 30 minutes, until the mixture reaches a thick soft-serve consistency.
Step 5: When the ice cream is thickening well during the final few minutes of churning, slowly add the chocolate chunks through the opening of the machine while it continues to run, allowing them to be incorporated throughout the ice cream as it finishes churning.
Step 6: To assemble the finished Cherry Vanilla Ice Cream, spoon one third of the churned vanilla chocolate chunk ice cream into a freezer-safe container. Spoon one third of the chilled cherry filling over the ice cream layer. Repeat the layering two more times finishing with a layer of ice cream on top. Do not fully stir the layers together as you want visible swirls and pockets of cherry filling throughout rather than a uniform mixed result.
Step 7: Press a piece of parchment paper or wax paper directly onto the surface of the ice cream. Cover tightly with a lid or plastic wrap and freeze for at least 2 to 3 hours until firm enough to scoop. Allow to sit at room temperature for 5 to 10 minutes before serving for the most beautiful clean scoops.
How to Serve This Cherry Vanilla Ice Cream Recipe
Serve generous scoops in white bowls or classic waffle cones where the swirls of cherry filling and chocolate chunks are beautifully visible from the outside. For an indulgent ice cream sundae presentation, top each serving with a drizzle of extra warm cherry sauce made from the leftover filling warmed gently in a saucepan, a cloud of fresh whipped cream, and a whole fresh cherry placed on top for a classic and iconic finishing touch. This ice cream is also spectacular served over a warm brownie, alongside a slice of vanilla layer cake, or simply eaten straight from the container with an enormous spoon, which is equally valid and deeply satisfying.
How to Store This Cherry Vanilla Ice Cream Recipe
Store the finished ice cream in a freezer-safe container with parchment pressed directly on the surface for up to 2 weeks. The parchment is essential for preventing ice crystals from forming on the exposed surface of the ice cream. If the ice cream becomes very hard during extended storage, remove it from the freezer and allow it to temper at room temperature for 5 to 10 minutes before scooping. Always cover the ice cream surface tightly after each use to minimize air exposure which is the primary cause of ice crystal formation.
Tips to Make This Cherry Vanilla Ice Cream Recipe
Always pre-freeze whatever container you plan to use for storing the finished ice cream by placing it in the freezer for at least 30 minutes before you need it. A cold container significantly slows the rate at which the churned soft-serve ice cream melts as you transfer it, giving you more time to properly layer the cherry filling without the ice cream becoming too soft. Pre-chill the mixing bowl and the ice cream base in the refrigerator for 30 minutes before churning if possible for faster and more efficient churning with less ice crystal formation.
Helpful Notes for This Cherry Vanilla Ice Cream Recipe
This recipe uses no eggs, which means there is no cooking involved and no risk of scrambled eggs or curdling. The smooth creamy texture comes entirely from the correct proportion of heavy cream to whole milk and the air incorporated during churning. Do not attempt to substitute lower-fat milk or cream alternatives as the fat content is what prevents large ice crystals from forming and keeps the texture soft and creamy rather than icy and granular. Add the chocolate chunks during the final minutes of churning rather than at the beginning as adding them too early causes them to be crushed and ground by the dasher rather than remaining as satisfying whole chunks throughout the ice cream.
Variation of This Cherry Vanilla Ice Cream Recipe
For a black forest cherry variation that is spectacularly decadent, add 2 tablespoons of dark cocoa powder to the vanilla ice cream base before churning and use very dark 70% chocolate chunks for a deeply chocolatey result that pairs magnificently with the cherry swirl. For a peach version using the same technique, replace the cherry filling with a quickly made fresh peach compote using sliced ripe peaches, brown sugar, lemon juice, and cinnamon simmered briefly until thickened. Swirl through vanilla ice cream for an extraordinary summer peach ice cream that captures the season perfectly.
FAQs About This Cherry Vanilla Ice Cream Recipe
Can I use frozen cherries instead of fresh for this Cherry Vanilla Ice Cream?
Yes, frozen cherries work very well for the cherry filling. Thaw them completely before cooking and drain any excess liquid. The filling may need a slightly shorter cooking time as frozen cherries release more juice quickly when heated. The flavor is excellent and makes this recipe achievable all year round regardless of fresh cherry season.
Why is my Cherry Vanilla Ice Cream not freezing properly in the machine?
If the ice cream is not setting up after 30 to 40 minutes of churning, the ice cream maker bowl was likely not frozen adequately before starting. Pour the base into a container, refrigerate for at least 30 more minutes to chill thoroughly, return the bowl to the freezer until solid, then try churning again. The base must also be cold before entering the machine.
How do I keep homemade Cherry Vanilla Ice Cream from becoming too hard in the freezer?
Ensure your sugar measurement is accurate as sugar lowers the freezing point of the mixture and keeps ice cream soft and scoopable. Also ensure you are using the full amount of heavy cream as fat content significantly impacts softness. Pressing parchment directly onto the surface before covering minimizes ice crystal formation.
Can I make Cherry Vanilla Ice Cream without an ice cream maker?
Yes. Pour the mixed base into a freezer-safe shallow container and freeze for 45 minutes. Remove and stir vigorously then return to the freezer. Repeat this process every 30 minutes for 3 to 4 hours until creamy. Swirl in the chilled cherry filling during the final stir. The result is slightly icier than churned ice cream but still genuinely delicious.
Conclusion
This Cherry Vanilla Ice Cream is a genuinely spectacular homemade frozen dessert that captures everything wonderful about summer in every single scoop. The silky vanilla base, the vibrant fresh cherry swirl, and the dark chocolate chunks together create an ice cream that is utterly unforgettable and completely impossible to resist. Make it for your family this summer and watch it become an instant tradition. Share your beautiful scoops with the Recipes Charming community! Discover more incredible summer recipes at Recipes Charming and follow us on Pinterest for daily inspiration from Charlie. Happy scooping!
Print
Cherry Vanilla Ice Cream The Most Incredible Homemade Summer Frozen Dessert
- Total Time: 2 hours 45 minutes
- Yield: 1.5 quarts 6 to 8 servings 1x
Description
Silky homemade Cherry Vanilla Ice Cream with swirls of fresh cherry filling and dark chocolate chunks throughout a rich creamy vanilla base. An easy no-cook ice cream maker recipe for the perfect summer frozen dessert.
Ingredients
2 cups fresh cherries pitted and halved
2 tablespoons granulated sugar for cherry filling
2 tablespoons water
1 tablespoon cornstarch
2 cups heavy whipping cream
1 cup whole milk
3/4 cup granulated sugar for ice cream
4 teaspoons pure vanilla extract
Pinch of coarse sea salt
1/2 cup dark chocolate chunks
Instructions
1. Make cherry filling by simmering cherries sugar water and cornstarch 8 to 10 minutes until thick and glossy then cool and refrigerate completely
2. Freeze ice cream maker bowl 24 hours ahead of time
3. Whisk heavy cream milk sugar vanilla and salt together until sugar fully dissolves
4. With machine running pour ice cream base into canister and churn 20 to 30 minutes until soft serve consistency
5. Add chocolate chunks through machine opening in final minutes of churning
6. Layer one-third ice cream then one-third cherry filling in freezer container repeating layers twice
7. Press parchment directly on surface cover tightly and freeze 2 to 3 hours minimum
8. Allow to temper 5 to 10 minutes before scooping
Notes
Cherry filling must be completely cold before layering into ice cream.
Add chocolate chunks in final minutes of churning to preserve whole pieces.
Press parchment directly on ice cream surface to prevent ice crystals.
- Prep Time: 20 minutes
- Cook Time: 25 minutes
- Category: Dessert
- Method: Ice Cream Maker
- Cuisine: American
Nutrition
- Serving Size: 1 scoop
- Calories: 390
- Sugar: 38g
- Sodium: 55mg
- Fat: 25g
- Saturated Fat: 15g
- Unsaturated Fat: 8g
- Trans Fat: 0g
- Carbohydrates: 40g
- Fiber: 1g
- Protein: 4g
- Cholesterol: 85mg
Keywords: cherry vanilla ice cream, cherry vanilla ice cream recipe, homemade cherry ice cream, cherry garcia ice cream, easy vanilla ice cream recipe